Tuesday, 17 May 2016

Louise Photography Evaluation: Weather Photo 9


For this assignment we were assigned with the task of taking our own photos for our chosen theme. My chosen theme was the effects of weather setting out to take a photo of bad weather and showing the effects that it can cause. My inspiration was the newspapers such as The Daily Mail that have covered bad weather patterns and reported the effects the weather caused with the hope of recreating that through my image.
 
To begin this project I began researching possible locations narrowing down to 3 possible places Southdown's field, Ports down hill and South sea beach. My ultimate decision was the field next to Southdown's field where it is peaceful and has a tree that can be a good object to show the effects of weather. Once I decided on my location I next planned out what equipment I needed to use I was originally going to use a Nikon camera because of the different settings that I could use but finally used my phones camera instead because of time constraints. The final stage of planning was what kind of weather I wanted to have and what day it would be like this. My ultimate decision was cloudy weather with possible rain this is because I feel that this kind of weather is more fun and has better effects on the environment. Before I took the official photos I researched similar weather photos to understand things such as camera angles, focus, depth of field and focus points.

My final location decision was the field near southdowns field this is because the field has a great focus point thanks to the tree. Also the surrounding areas can show the effects of weather really well. The day that I did it I was very fortunate with the weather as it was cloudy with spots of rain also it rained the night before so the effects of weather could be shown in the environment. When taking the photo I made sure that the focus lines was correct to how I planned it. I also needed to make sure there were no people in front of the camera and that there was not any blur. During my research of other peoples work I noticed that they had a big focus on focus lines and the environment. A reason I picked bad weather was because that is a popular focus for photographers and it attracts interest especially storms because the damage it does to the environments. Also there is a sense of calm and relaxation when looking a at a image with bad weather. Another thing I picked up from other pieces of work when researching was that they also used environments that were in distant areas like fields or the countryside or the beaches not busy city environments. I tried to use as many parts from works I researched as possible towards my final piece of work especially the locations and weather. I wanted to use as much natural lighting as possible as I feel natural and real effects of weather and lighting has more of a impact on how you feel when looking at the image than a edited image. Also out of most images I looked at when researching they also opted for natural lighting without too much editing.

I think that the final image went really well when taking it the weather was just how I planned it with the grey clouds and the slight spots of rain. I think that my smartphones camera performed well with barely any technical limitations although I believe a camera could have still been a better choice because of the options I could have used to take the photo with. But my phone was a good choice in terms of time management. The feedback I got when I showed this image was very positive with the main praise coming from the location the focus and I chosen on the tree. I did do a small amount of editing with the image adjusting the grasses lighting making it a little brighter as the camera had trouble capturing the dark grass. Thanks to this assignment there is a lot that I have learned. The main thing I have learned is time management and self-planning. Also having confidence in my self and my decision-making was a big plus as in the past I always had problems making final decisions so this unit has definitely helped with that. If I had to try something different it would be the device I used to take my photos while the smartphones camera still did a good job I feel a camera would have given the image the full quality that it deserved. Overall I really enjoyed this unit and photography as a whole I hope to do more projects like this in the future.


Tuesday, 12 April 2016

Weather photos

Test Shots


Contact Sheet 


Final shots 


Edited photo


For Editting i added a extra layer of grey to the clouds to make the weather fill more grim and moody like the theme that i wanted to portray.

Tuesday, 15 March 2016

louis photography

Throughout the year I have learned and refined various different skills in photography.

ISO: Iso is the level of sensitivity of your camera with light. The lower the number the less sensitive it is to light the higher the number the more sensitive it is. ISO settings as you can see below can go from 50 to as high as 6400 making the image extremely sensitive to light.


We also used soft and hard light to take photos for indoors and outdoors. hard light is used indoors because of its higher contrast soft light is used for larger objects.


The Effects of weather: In recent weeks the weather has been really bad with high pressure winds hitting the south coast hard and heavy amounts of rainfall. Storm weather is my favourite kind of weather when being indoors because it adds a air of relaxation but when outside i love the hot summer weather. This is the topic i have chosen for my photographs.

Shutter speed: Is a setting on the camera it controls the length of time the shutter is open and allows the light to travel through the lens. If the shutter is open for too long it will create a picture that is over exposed which is where too much light travels through the lense causing a image that is too bright. If the shutter is not open long enough you will get a image that is under exposed which means that there is not enough light in the image causing it to be dark and hard to see.


Leading lines: Creates a path for the eye to follow. Can draw you to a focal point this is the part of an image that your want to draw attention to. Draws you into the picture and makes the image 3D.


Focal points: A focal point is the most important part of an image. On a grid the focal points are essentially lines in on both sides.


Depth of field: is the focus on the image between distance. The background is usually blurred out while the main feature is focused on.


Aperture: Is a hole where light travels through the camera the bigger the aperture the more bright the photo meaning more blur. The smaller the aperture the darker the image.


These photos involved me putting a timer on to the camera and then painting the air with light using our flashlights the results were successful. 


                  This was my final photo for my weather project. Also included is my contact sheet of the other photos i taken. 


Tuesday, 1 March 2016

Photoshoot proposal

For our photography project we had to pick a theme of our choice to take photos of and send off for submission. My chosen theme is the effects of weather which looks at the weather and the different cloud formations. Preferably i would like to take my photos during a rainy or cloudy day as i feel bad weather is more interesting than just plain clear skys and sunny weather. The reason for this is because that bad weather has more variety in terms of formations and makes the surrounding environments more interesting whether its the puddles from rain fall or even possible damage from heavy winds this is why i have chosen effects of weather.

In terms of what my actual plan is for my photograph I would like to try and take a photograph somewhere nearby where i live in Crookhorn as i feel that this area has plenty of different places that look beautiful when touched by bad weather and grey clouds. A specific area that i was thinking of was the Southdown's college field this is because the long draw distance can allow for a wider shot that can show both the cloud formations and the effect that the weather has had on the environments. An alternative possibility is the park near the Crookhorn Golf course another area with a big draw distance that also will allow for some incredible shots. The equipment that i plan to use to take these photographs is a Nikon camera or alternatively if the Nikon is not available then i will use the Canon camera. Also i hope to be able to use a tripod to help with quality and reduce the possibility of camera shake.

I am hoping the weather will be either raining or filled with grey clouds and heavy winds, if the weather does turn out like this i will have to take various precautions in order to protect the equipment. I will use either a coat or a protective cover to protect the camera from the rain. I will make sure that the tripod is tightened and placed somewhere that won't effect balance keeping the equipment still and safe without the possibility of it falling over and causing damage. A final precaution is that when i am not using the equipment i will keep it in a safe place either in my house or back in the office.

In terms of technical considerations i will adjust the brightness so that depending on the clouds i can improve the lighting to hopefully add a sense of detail in the image. I will also adjust shutter speed to make sure that the amount of light travelling through is not too much that it makes the image too bright. Other smaller considerations include making sure that the camera i am using is fully charged and finally if i decide to use a prop i will make sure that it is a prop that will not take away from the environment and attract too much attention. If possible i would like to use a model to add something extra to the environment possibly a reaction to the weather this all depends on the area that i use and the weather that is currently forecast.

Tuesday, 23 February 2016

Photoshoot considerations

1. Make sure camera is fully charged

2. Make sure that the equipment is protected should the weather make a unexpected change

3. Make sure the model is available

4. be sure that chosen location is reachable and not too far

5. Make sure that the chosen location is somewhere that will not take away from the focus of the image and compliment the brand.

6. Give model clear instructions in order to make the best photos possible.

7. Adjust the lighting in the studio make sure that hard and soft lighting is organised well.

8. Adjust shutter speed and depth of field to suit the style of image.

9. Props that are available and how you want to use them.


Tuesday, 9 February 2016

Mood Board and photo techniques

Lighting: could be dark or light doesn't matter as long as there is street lights around to add to lighting also camera flash will assist with seeing the clouds.

Colours: Weather will provide a variety of colours from the orange sun to the blue skys or the grey cloudy sights of the rainy storms.

Texture: If it is raining it will leave everything in the environment wet and damp. Also if the temperatures are exceptionally cold everything around will be cold.

Inspiration: My inspiration is the photos taken to showcase extreme weather effects the angles they use and the way they take the photos is something that i aim to replicate.

Shapes: i will be describing the shape of cloud formation and the variety of different shapes in the environment that i use to take photographs in.

ISO: Depending on the force of the weather i will adjust the ISO speed to a level that i can take a good quality photo.

Aperture: Depending on the lighting available for example if i take a photo on a cloudy rainy day the lighting will be quite dark so i will set the aperture lower to add light to the photo. If it is a light day i will set the aperture higher to let less light in.


These photos was my inspiration for my ideas for bad weather i hope to be able to take a photo similar to one of these when it comes to my final image.

Creative photography

Love: I have a huge passion for video games it is something that i have been doing pretty much all my life. My love for this industry is never ending and would love to work in a job that ties into this industry one day.


The Effects of weather: In recent weeks the weather has been really bad with high pressure winds hitting the south coast hard and heavy amounts of rainfall. Storm weather is my favourite kind of weather when being indoors because it adds a air of relaxation but when outside i love the hot summer weather.


Urban culture: Each modern day city has a variety of different cultures and religions within. Every city has a variety of residents from black, white, european, south american, muslim and many more. We live in a multicultural world these days there is no distinction everyone has a equal opportunity.


Tuesday, 26 January 2016

ISO

ISO: Iso is the level of sensitivity of your camera with light. The lower the number the less sensitive it is to light the higher the number the more sensitive it is.

On our camera the lowest number is 100 while the highest number is 6400 our model is Canon

The best in a low light situation would be a high number as it adds light and brightness.
The drawback is that there will be more of a camera shake and less realistic colours. Also even aspects such as noise could get into the image. Also the natural style of the image could be lost. Because there is so much light being added the image could become blurry and lose its quality.
A low number is best for a high light situation as it doesn't let in as much natural light. drawback to a low number is camera shake and can also blur out moving parts of your photograph. The depth of field also could be more limited because of the wider apertures used to allow more light in.


  This was our first image taken we used a low ISO at 400. The ISO setting and number we used was good enough because of the weather and the clouds adding quality.

                         This was a attempt at a low ISO image but the corridor was too dark


These 2 final images was taken at a high ISO at 3200 the image at the top is of college steps the high ISO adds light while the image below was taken in a dark corridor.

As you can see over all the 4

Tuesday, 19 January 2016

Shutter speed


As you can see with these 3 images we tried to use a flashlight while in the dark to create a light paint. To do this we opened the shutter for 6-30 seconds and moved the flash light around to create a design or swirl. The designs could have been better with the table not being in the way but for a first attempt i felt this was successful and did what we set out to do.


Shutter speed: Is a setting on the camera it controls the length of time the shutter is open and allows the light to travel through the lens. If the shutter is open for too long it will create a picture that is over exposed which is where too much light travels through the lense causing a image that is too bright. If the shutter is not open long enough you will get a image that is under exposed which means that there is not enough light in the image causing it to be dark and hard to see.

DSLR: Digital single lense reflex camera, is a automatic camera that combines optics and mechanics of a single lens camera with a digital imaging sensor.

Tuesday, 5 January 2016

Photography ( leading lines and focal points)


Photo 1 was a taken down a narrow area between 2 buildings. The focus points is the 2 buildings which the eye attracts. The leading lines are also around either side of the buildings. 
             

Photo 2 was taken on a field area showing a contrast between nature and man made structures. The field creates negative space while the pylon in the background forms the focal point. The leading lines are centred around the pylon.

 Photo 3 was taken down a narrow entrance way with a building on one side, natural plant life on the other side and a man made path way in the middle. The focus point is the stairs in the middle. The leading lines are placed where the building and the bushes are.


Photo 4 was taken at the bottom of the stair way with a camera placed on the bottom step. The focus point is the top step while the leading lines are also by the top.
 Photo 5 was taken at the top of the stairs overlooking the area as a whole. The focal point is the tables and the building in the background while the leading lines are where the trees are and the tables.
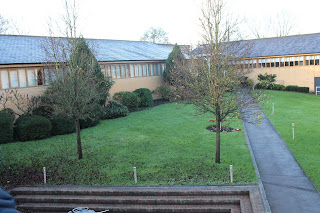
finally photo 6 was taken on a balcony exposing the background. The focus point is the 2 trees with the field acting as negative space. leading lines are centred around the 2 trees.

Leading lines: Creates a path for the eye to follow. Can draw you to a focal point this is the part of an image that your want to draw attention to. Draws you into the picture and makes the image 3D.

Focal points: A focal point is the most important part of an image. On a grid the focal points are essentially lines in on both sides.

The rule of third is used to focus the focal points of a photo. This is done by creating a grid in the form of a noughts and crosses style design. The main focal points are highlighted through the use of lines in the grid dividing and separating the focal points from the rest of the photo. The grid devices the photo in 3 lines both horizontal and vertical. The rule of thirds is a compositional technique and is structured in this way. The image symbolises hard work and team work showing that you can achieve anything together when you put your mind to it. The rule of third technique adds focus to individual points of the image for example the art work is put into focus to showcase the handwork that has been put into it.

Depth of field