ISO: Iso is the level of sensitivity of your camera with light. The lower the number the less sensitive it is to light the higher the number the more sensitive it is.
On our camera the lowest number is 100 while the highest number is 6400 our model is Canon
The best in a low light situation would be a high number as it adds light and brightness.
The drawback is that there will be more of a camera shake and less realistic colours. Also even aspects such as noise could get into the image. Also the natural style of the image could be lost. Because there is so much light being added the image could become blurry and lose its quality.
A low number is best for a high light situation as it doesn't let in as much natural light. drawback to a low number is camera shake and can also blur out moving parts of your photograph. The depth of field also could be more limited because of the wider apertures used to allow more light in.
This was our first image taken we used a low ISO at 400. The ISO setting and number we used was good enough because of the weather and the clouds adding quality.
This was a attempt at a low ISO image but the corridor was too dark
These 2 final images was taken at a high ISO at 3200 the image at the top is of college steps the high ISO adds light while the image below was taken in a dark corridor.
As you can see over all the 4
Tuesday, 26 January 2016
Tuesday, 19 January 2016
Shutter speed
As you can see with these 3 images we tried to use a flashlight while in the dark to create a light paint. To do this we opened the shutter for 6-30 seconds and moved the flash light around to create a design or swirl. The designs could have been better with the table not being in the way but for a first attempt i felt this was successful and did what we set out to do.
Shutter speed: Is a setting on the camera it controls the length of time the shutter is open and allows the light to travel through the lens. If the shutter is open for too long it will create a picture that is over exposed which is where too much light travels through the lense causing a image that is too bright. If the shutter is not open long enough you will get a image that is under exposed which means that there is not enough light in the image causing it to be dark and hard to see.
DSLR: Digital single lense reflex camera, is a automatic camera that combines optics and mechanics of a single lens camera with a digital imaging sensor.
Tuesday, 5 January 2016
Photography ( leading lines and focal points)
Photo 1 was a taken down a narrow area between 2 buildings. The focus points is the 2 buildings which the eye attracts. The leading lines are also around either side of the buildings.
Photo 2 was taken on a field area showing a contrast between nature and man made structures. The field creates negative space while the pylon in the background forms the focal point. The leading lines are centred around the pylon.
Photo 3 was taken down a narrow entrance way with a building on one side, natural plant life on the other side and a man made path way in the middle. The focus point is the stairs in the middle. The leading lines are placed where the building and the bushes are.
Photo 5 was taken at the top of the stairs overlooking the area as a whole. The focal point is the tables and the building in the background while the leading lines are where the trees are and the tables.
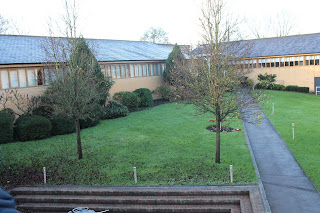
finally photo 6 was taken on a balcony exposing the background. The focus point is the 2 trees with the field acting as negative space. leading lines are centred around the 2 trees.
Leading lines: Creates a path for the eye to follow. Can draw you to a focal point this is the part of an image that your want to draw attention to. Draws you into the picture and makes the image 3D.
Focal points: A focal point is the most important part of an image. On a grid the focal points are essentially lines in on both sides.
The rule of third is used to focus the focal points of a photo. This is done by creating a grid in the form of a noughts and crosses style design. The main focal points are highlighted through the use of lines in the grid dividing and separating the focal points from the rest of the photo. The grid devices the photo in 3 lines both horizontal and vertical. The rule of thirds is a compositional technique and is structured in this way. The image symbolises hard work and team work showing that you can achieve anything together when you put your mind to it. The rule of third technique adds focus to individual points of the image for example the art work is put into focus to showcase the handwork that has been put into it.
Depth of field
Subscribe to:
Comments (Atom)


